If you have a Tomato firmware-capable router and a few spare minutes, you can join World IPv6 Launch Day on June 6th even if your ISP does not yet offer native IPv6. Not too familiar with IPv6? This bit on Wikipedia should at least get you acquainted with the addressing scheme.
Tunnel Broker
You'll first need to register a Tunnel Broker account, if you haven't done so already. It is free, and it enables to you to create up to 5 IPv6 tunnels for yourself. The default prefix for a tunnel is /64 (around 18 quintillion addresses), however /48s are available as well (a lot, lot more address space than a /64).
Once you're logged in, just click on Create Regular Tunnel and proceed to enter your current IPv4 address as assigned by your ISP. You'll need to allow ICMP if you haven't already. ICMP should remain enabled, as there is no real security benefit to disabling ICMP in the first place.
Tunnel Broker will confirm you're responding to ICMP and then suggest a tunnel location. Feel free to follow the suggestion or pick another one. You'll want to select a tunnel as close as possible to your location to ensure low network latency.
Once your tunnel is created, you'll need to refer to the Tunnel Details page and prepare to transfer some of this information over to the IPv6 configuration for your router.
Tomato Configuration
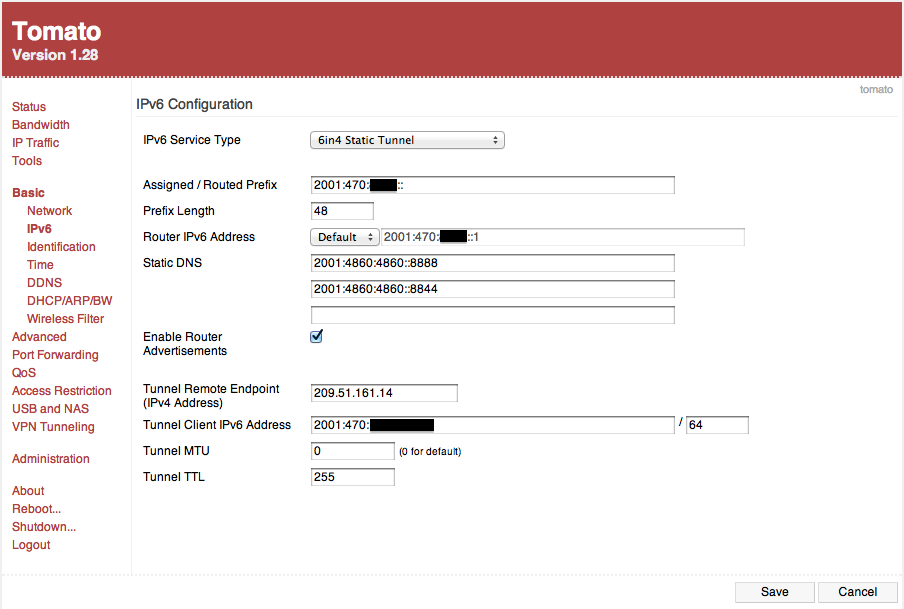
Within Tomato, click Basic, IPv6. For IPv6 Service Type, select 6in4 Static Tunnel. Based on the values on your Tunnel Broker Tunnel Details page, each of the fields on your Tomato firmware IPv6 configuration page should be populated as such:
- Assigned / Routed Prefix: this is the
Routed /64orRouted /48for your tunnel, depending on which you'd like to use. Don't include the prefix length (the forward slash and number at the end of the address). - Prefix Length: the number that comes after the forward slash, which will be either 64 or 48.
- Router IPv6 Address: you can let Tomato populate this. It will typically be your IPv6 prefix ending in 1.
- Static DNS: you can use either the Tunnel Broker
Anycasted IPv6 Caching Nameserver, or a public IPv6 DNS service of your choice. - Enable Router Advertisements: keep this box checked, so that clients on your network will be able to see IPv6 router advertisements and take advantage of autoconfiguration.
- Tunnel Remote Endpoint (IPv4 Address): this refers to your tunnel's
Server IPv4 Address. - Tunnel Client IPv6 Address: this refers to your tunnel's
Client IPv6 Address. - Tunnel MTU and Tunnel TTL: leave these values at their default.
Client Autoconf
This part is easy by design. If you've configured everything correctly, any IPv6-capable machines on your local network will automatically see the router advertisements and configure an address. You may want to do a gratuitous reboot of your machines and the router.
If you need or want to do static configuration for any hosts on your network, you'll want to follow Tunnel Broker's suggested configuration for your operating system under the Example Configurations tab.
Updated March 28: The official version of Tomato doesn't include support for IPv6 and a number of other handy features. A number of modified versions are available which do support IPv6 -- I used a version called "Toastman".
This written work is licensed under a Creative Commons Attribution-ShareAlike 4.0 International License.